
Refresh and Reclaim: Upcycling Furniture and Simplifying Your Space
- freerangefarmhouse
- Jan 20
- 4 min read
When January rolls around, if you're like most of the country, that means it's purge time in your house. At least that's how it was for us. The holidays were magical, the decor was beautiful, but when it all comes down, everything else goes down too. In our house this means every single room is getting decluttered and made more functional. This January I'm 25 weeks pregnant so maybe that's why this year seems like there's a little more purging than normal. Regardless, I'm here for it and knew it was time to simplify our space.

I went through the kids' rooms and did toy and clothes purges, and even did a room transformation for my son. We took most of the toys out of his room, added bunk beds, and made room for a crib. Eventually they'll share a room, but for now, we're just winging the sleeping situation. I still can't believe we're having another baby!
After all of the toys left my son's room and re-entered the back playroom, it was time for a huge back room makeover. We were recently given this beautiful grey and white gingham Pottery Barn couch. It was well loved by a family from our church and it just needed a good cleaning. I was so excited about it and knew it would be the perfect fit for our playroom, and could also double as a place for my brother to sleep when he and my parents are in town!


Once this couch was in the back room, although it made the entire room feel cozy, there was just so much going on and we needed a completely new organizational system to make it work and feel functional. I started to look around at our space and take notes of what needed to move, what needed to leave, and how we could best utilize the space we currently have. Since we're a homeschool family, I had antique school desks in our back room for the kids to do their school work in, and while I loved the look of them, they just weren't the most practical thing in the world.
When we first built our house, my husband built an L-Shaped desk for me to put my heat press, my sublimation printer, and have some organizational space for school stuff. As I started looking for some inspiration on Pinterest, I loved seeing so many families set their kids up to do their schoolwork at an L-Shaped desk. I knew it was time to move everything around. Since I only do so many sublimation projects a year, I knew that I could change the entire feel of the room by moving all of my stuff off of the desk, moving the antique desks out, and adding some chairs to the desk. We began to purge even more toys, books, and anything that hasn't been touched in a year. I don't know how it happens, but it seems like playrooms just have a natural tendency to collect any and every thing.
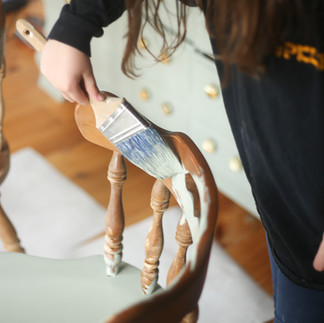
With this new inspiration, I began hunting for some wooden chairs. I started in my favorite Facebook group, Buy Nothing Project. I wasn't too picky about their condition because I'm not afraid of a project. I didn't see anything coming up in the group, so I went to thrifting. We were at our first thrift store when we found these beautiful wooden chairs. They were $10 a piece, but when we got to the register they were marked down to 50% off. We got both chairs for just $10! I was so excited. You could tell that they had been outside because there was a little bird poop on them and then the top layer of seal/stain was chipping off.

I would have loved to have kept these the original stain, but because everything was flaking off, we figured we would just paint them. This is where I'm a sucker for a budget. I was't picky about the color, I just wanted to use up whatever we had at the house. As long as the paint color was warm and cozy, that was fine with me. We had almost an entire gallon of SW Evergreen Fog in our attic and I was so excited to see that. It's the perfect green/greige color in my opinion. We began sanding off all of the finish that had begun chipping and had the sweetest help doing so. After everything was sanded, we wiped everything off, vacuumed, and started painting. All in, this project only took about 4 hours.


Utilizing this space in this way has completely changed the feel of our back room! It makes everything feel purposeful while still being cozy. I couldn't be happier with it and how our $10 chairs turned out! Do you like DIY projects? What's on your project to-do list--leave a comment below!

For my next project, I'm thinking the black shiplap needs to be painted. I'd also love to bring in some curtains to the back room. If you had to paint the shiplap, what color would you paint it?
This post contains affiliate links, which means I make a small commission at no extra cost to you. As an Amazon associate, I earn from qualifying purchases.